
After 16 years of near daily use, one of my Beolab 3 speakers finally bit the dust. The right speaker suddenly stopped playing and when I went over to have a look its power LED had extinguished. There were no signs of life – it was time to open it up.
Note: this unit contains dangerous voltages which can still be present even if the unit is unplugged. Exercise caution when disassembling the unit. Follow along at your own risk.
This blog post was written after this repair was completed, so my apologies for the lack of photos. Nevertheless, I found a great video on YouTube detailing the teardown process. The service manual also contains great information on the disassembly and workings of the speaker.
Troubleshooting
Upon opening the unit, there were no obvious scorch marks or the smell of burnt electronics. So, it was time to follow the first step in troubleshooting electronics: thou shall check voltages. The Beolab 3 has 3 primary PCBs: the class D amplifier, signal processing board, and power supply unit (PSU). Given that the power LED was not lighting up, I decided to start at the front of the circuit and check the output of the PSU.
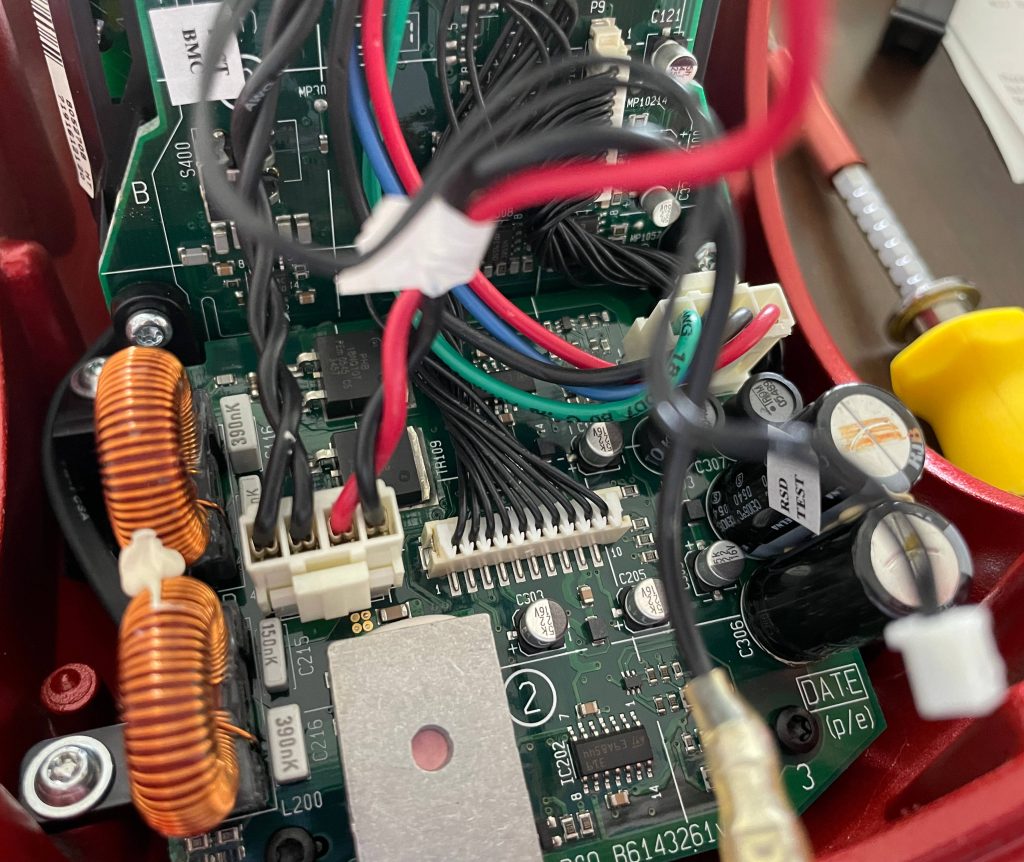
According to the wiring diagram in the service manual, the main output of the PSU is a 4-pin connector (green, blue, black, red) which connects to the amplifier board as seen in the image above. It has a +/- 38V and +/- 26V rail.
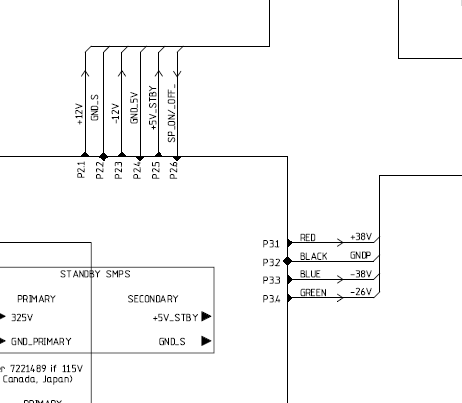
Probing these connections (carefully) with the unit plugged in, I measured no output on either of these outputs. Later, I noticed there was a 5V standby rail as well as a speaker on/off input. It seems that if the PSU is not getting the ‘speaker on’ signal from Powerlink input or line signal detection circuit, the main output is shut down. Indeed, the block diagram also indicates that the 5V output is permanently on which powers the detection circuitry. Nonetheless, I was not measuring any voltage on the 5V standby output either so the fault seemed to lie with the PSU.
I proceeded to measure the input resistance to the speaker and my meter didn’t register a reading which likely meant the input was open circuit. On the underside of the board there is a component labelled ‘F501’ which was an input fuse. Lo and behold, it did not measure any continuity so something downstream had failed short. Given the age of the speaker, I suspected a capacitor had met its fate so I started measuring resistance of the main filter capacitors. Shortly after, I measured a dead short on capacitor C510. To double check, I desoldered it and measured it again to confirm. Near 0 Ω!
Finding the parts
The cap in question is a Vishay 270 µF 200V with the part number 2222 157 52271. It is stil available from Digikey, but only in large quantities. Given that I didn’t want 800 of them, I looked around for an equivalent and found one by TDK with the part number B43504E2277M000. It is very similar in specs electrically to the Vishay replacement, but most importantly its footprint and physical dimensions were identical. As for the fuse, it is a Littlefuse 382 2.5A 250V through-hole mount with the part number 38212500410.
Since I already had the speaker apart and was buying parts, I decided to replace the other identical capacitor in series (C509) at the same time. I also ordered some spares as I thought the other speaker might have a similar fault soon so when that time comes I will be prepared, unless another component gives out.
It’s quite impressive that the capacitor lasted operated for this long before failing. Looking at its datasheet, the rated operating hours at 40°C is 90,000 hours which equates to just over a year under continuous use. Considering the speaker has been plugged in almost continuously throughout these years, it has certainly exceeded its claimed lifetime.
Putting it back together
After a few days of placing the order, the fuse and capacitors arrived. Ecstatic about finally getting stereo sound back, I soldered them in to place and assembled most of the speaker back. Next the woofer and radiators were installed, the speaker plugged was in, and the red power LED lit up – the repair was a success. Success!
That marks the end of my journey in fixing my speaker. Hopefully this post helps someone with a similar issue. It has been almost 3 months now since the repair and the speaker has been working great. These speakers are fairly impressive, especially for their size, so I’m glad I could get these going again.